Clients - ORT Client
Usage
The ORT client is the Yarra client for submitting reconstructions tasks from the consoles (host computer) of Siemens MRI systems. When started, the client will automatically connect to the Yarra server and read the list of configured reconstruction modes (see this page on how to configure of reconstruction modes).
Afterwards, it will show the main application window where all recent patient exams are listed that match to the defined reconstruction modes (i.e., protocols that contain the protocol tags defined in the reconstruction modes). When reconstruction tasks are submitted right after a patient exam (e.g., before the patient is taken from the table), the scan to-be-reconstructed is shown in the top row. The client will automatically assign the correct reconstruction mode based on the tags contained in the protocol name. The selected reconstruction mode can be seen in the user control “Reconstruction Mode:”, which is shown below the list of scans.
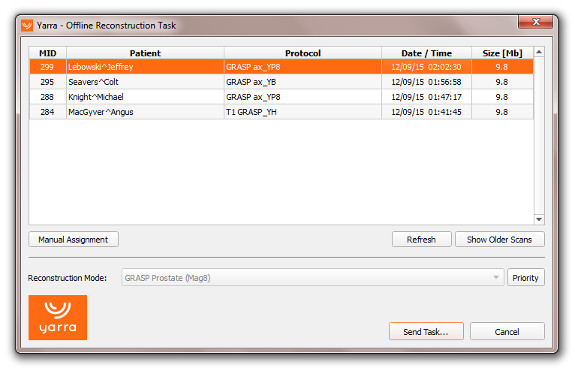
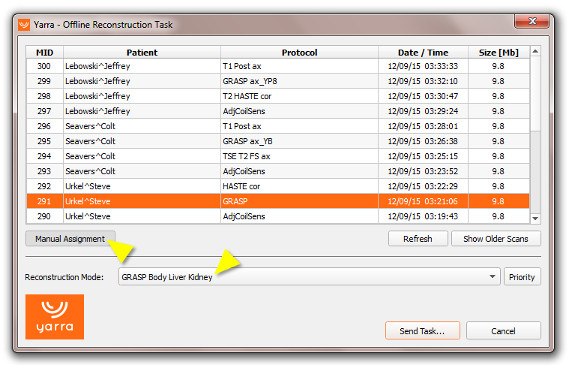
If a scan has been performed with incorrect protocol name (or if the protocol tag has not been added to the protocol name yet), it is possible to overwrite the automatic assignment of the reconstruction mode. This can be achieved by clicking the button “Manual Assignment” (see below). The client will now show all scans available on the system (including the adjustment scans) and not just those that match the protocol tags. It is then possible to select the scan in the list and to manually choose the desired reconstruction mode in the user control “Reconstruction Mode:”.
When clicking on the “Send Task…” button, a confirmation window will appear. If images should be sent to a PACS system, it is necessary to enter the Accession Number (ACC#) for the patient into this dialog. Some reconstruction mode also might ask for additional parameters.
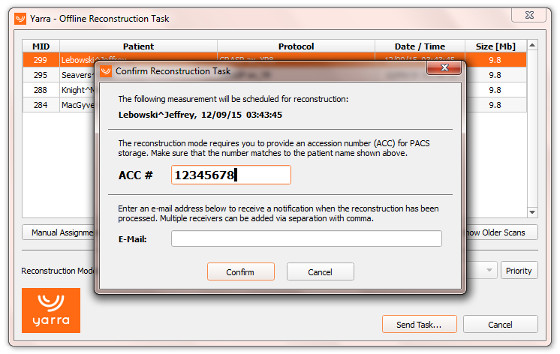
If desired, an email address can be entered into the field “E-Mail”. The Yarra server will then send email notifications if the reconstruction task has been completed or if an error occurred.
Only institution-internal email addresses should be used for the notifications. As the notifications contain PHI such as the patient name, external email addresses must not be used (and will be blocked).
When clicking “Confirm” the client will start transferring the data to the Yarra server. This occurs in 2 steps: In the first step, the window shown below will appear. Until this window disappears (usually only several seconds), scanning is not possible.
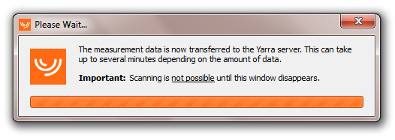
Afterwards, a small “running indicator” will appear in the right-bottom corner of the screen (not shown). When this indicator appears, scanning can continue.
When the data has been received by the Yarra server, the task will be placed in the task queue and processed. If many tasks are already in the reconstruction queue, it may take some time until the tasks is processed. If a reconstruction is needed urgently, it is possible to press the “Priority” button on the client’s main window, which will ensure that the task will be reconstructed before other tasks that are already in the queue. The status of the task queue can be monitored using the Yarra WebGUI.
Configuration
During the first start of the ORT client, it will automatically open the configuration window. Later, the configuration window can be opened by right-clicking on the orange Yarra logo of the main window and selecting “Configuration…”. The configuration window is protected by a password to prevent users from accidentally changing the configuration. The password is “nyc2012”.
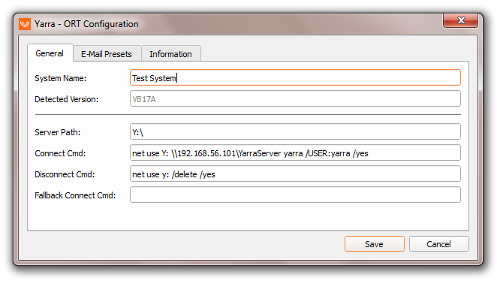
A unique System Name should be selected that allows to identify the MR system. This name will appear in log files and notification emails. The detected version of the Siemens Syngo MR software is shown below. The Server Path defines where the network share of the Yarra server can be found. In standard installations, the Yarra server will share the queue directory using the SMB protocol (see Server Installation), which is mapped to some drive letter. It is recommended to use the drive Y:\ for the mapping (unless drive Y:\ is already used on the host computer).
In the fields Connect Cmd and Disconnect Cmd, the Windows shell commands for connecting and disconnecting from the Yarra share should be entered. For standard installations using SMB shares, this is done using the “net use” command (but the Yarra clients also allow using different network systems if necessary).
If the Yarra server has been installed according to the steps on the Server Installation page, the following entries should be used:
Server Path: Y:
Connect Cmd: net use Y: \[ip of server]\YarraServer [password of user yarra] /USER:yarra /yes
Disconnect Cmd: net use y: /delete /yes
If a second Yarra server is available, it is possible to optionally enter a Fallback Connect Cmd. If the client is unable to reach the server listed under Connect Cmd, it will automatically connect to the fallback server and submit the task to the fallback server. Thus, if the main Yarra server should become unavailable for some reason, the reconstructions will be seamlessly redirected to the fallback server.
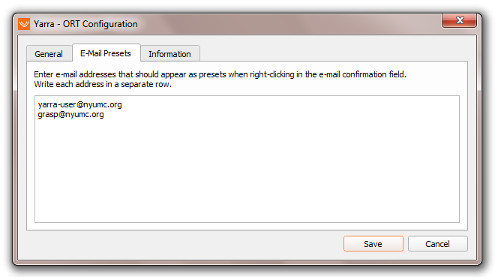
It is possible to define presets for the notification email addresses, which can be inserted into the confirmation dialog by right-clicking on the notification field. These email addresses have to be written into the textbox on the E-Mail Presets tab. Each email address should be written into a separate row (with no separator characters between the addresses).
Instead of installing the ORT client as application binary, it is now also possible to install it in the form of an IDEA sequence using the YarraLink sequence. This may circumvent regulatory issues related to installing application binaries on the MR system.