Clients - RDS Client
Introduction
The Yarra RDS client is a service that runs in the background on the host computer of Siemens MRI systems and can be used to automatically collect the raw data (Twix data) of certain scans and to transfer the data to a network location (or disk drive). RDS is part of the Yarra package for historical reasons and does not directly interact with the Yarra server. However, the data collected with RDS can later be submitted to a Yarra server using the SAC client. The typical use-case of RDS is to collect k-space data from scans acquired in routine clinical practice, in order to reprocess the data at a later time or to use the data for the development of new reconstruction algorithms.
Configuration
On the first start of the tool, it is required to configure the service. This can be done by double-clicking on the RDS.exe icon, which then shows a message that the service has not been configured yet and opens the configuration dialog. If the RDS client has already been configured, the configuration dialog can be accessed via the status screen by clicking on the “Configuration” button.
If the RDS service is running, you will see a small Yarra icon in the top-right corner (bottom-center for the XA software line). Double-clicking the Yarra icon will show the status window. Red color of this icon indicates that a configuration problem exists.
The configuration area is protected by a password to prevent users not familiar with the software from changing the configuration. The password is fixed for all installations and is “nyc2012”. The configuration dialog has three sections (tabs) relevant for RDS.
General
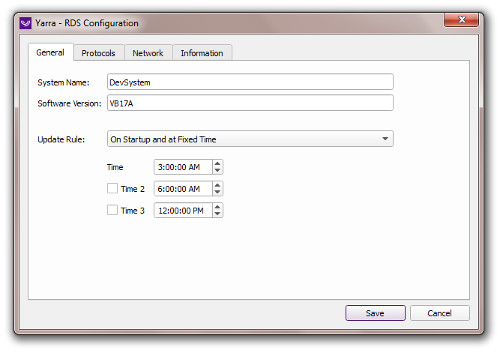
On the General tab, a unique System Name for the MR system has to be selected. The tab also shows the syngoMR Software Version that was detected on the system.
The Update Rule setting determines when the raw data is saved and transferred:
- On Startup: The update will be performed after the scanner is turned on and while the RF amplifier warms up. This setting should be used for MR systems that are shut down in the evening.
- At Fixed Time: The update will be performed at a certain time. Up to three update times can be defined. This setting should be used for systems that are not shut down in the evening, so that the update can be performed during the night.
- Periodically: The update will be performed periodically within certain time frames. This setting can be useful for systems that are used all day.
- Only Manually: The update will be performed only on manual trigger. To perform an update, open the main dialog by clicking on RDS.exe (or on the short-cut icon in the “Startup” folder) and clicking on “Transfer Now”. Alternatively, the update can be triggered with a separate icon in the Start menu (see optional installation steps).
- On Startup and at Fixed Time: With this setting, the raw data is transferred either when the scanner is turned on or at a certain time. It should be used on systems that are sometimes shutdown and sometimes run throughout the night. This rule is now the default setting for the update rule.
Protocols
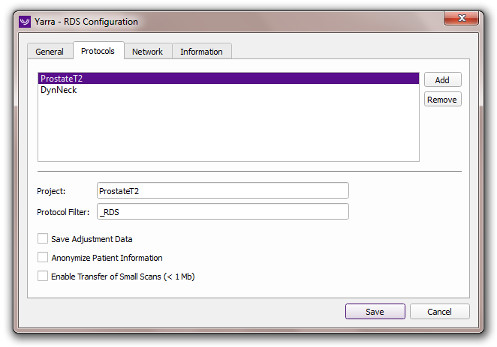
The Protocols tab allows to define which protocols should be saved. It is possible to create different “projects”. The raw data from different projects are then saved in individual subfolders. This helps to separate the data data from different research projects or researchers. To create a new project, press the Add button. Enter a project name into the field Project and a protocol tag into the field Protocol Filter (similar to the protocol tag of the Yarra reconstruction modes). The tool will then transfer the raw data from all scan protocols containing the name tag into the corresponding raw-data folder.
Example: For settings Project = ProstateT2 and Protocol Filter = _RDS, the tool will save all raw data from scan protocols containing the name tag _RDS, e.g. “TSE2D AX_RDS”. The files will be saved into a subfolder called “ProstateT2”.
The software can only parse the first 32 characters of the protocol name. Therefore, it is necessary to make sure that the protocol name is not too long. Alternatively, the tag can be put in front of the protocol name.
If you want to also save the corresponding adjustment data (pre-scan normalize), click the checkbox Save Adjustment Data. On VB software versions, this will create separate files containing the adjustment data where the file name indicates the corresponding main raw data file. On VD software versions, the adjustment data will be included into the main raw data file (multi-measurement format). If the patient data should be anonymized before the transfer, click the checkbox Anonymize Patient Information. This will remove the patient name, date of birth, and patient ID from the raw data (the institutional information will remain in the file).
On Siemens MR systems, shim scans that are performed prior to a scan appear in the scan list as protocol with identical name to the following imaging protocol. These scans have a small size (usually around 500-700 kB) and are often confused with the imaging data. Therefore, the RDS client ignores scans with a rawdata size smaller than 1 MB. If the desired rawdata is expected to be actually smaller than 1 MB, click the checkbox Enable Transfer of Small Scans.
Network
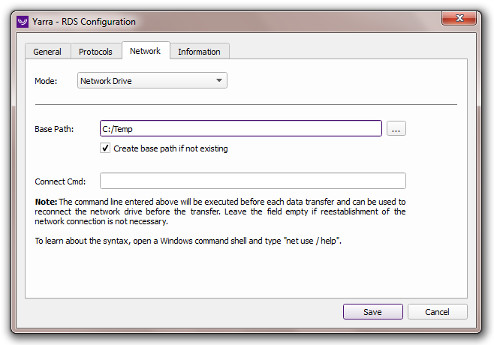
On the Network tab, the Base Path has to be selected where all data should be saved. In most use-cases, this path points to a mapped network share but it is also possible to save the data on an internal or USB disk drive. Usually, the same path is used for all installations of the RDS client. The client will then automatically create subfolders for each MR system under the base path. The path can be selected by pressing the button right of the Base Path field.
To ensure that the connection to the network share is always established when a data transfer should be performed, it is possible to enter a Windows shell command into the field Connect Cmd that maps the network share to the base bath. This command will be executed by RDS before each transfer run.
For Windows SMB shares (recommended as SMB share do not require installation of a network client), a network drive can be mapped using the “net use” command:
net use z: \\[servername]\[share] [password] /USER:[username] /PERSISTENT:YES /yes
where [servername] is the name or address of the server, [share] the share on the server, [password] the password and [username] the username on the server.
Usage
The RDS client runs as background process and is normally not visible. In the moment when a data transfer is performed (e.g., because the update time has been reached), the window shown below will appear. While this window is visible, scanning is not possible with the MRI system. If the scanner is urgently needed, it is possible to press the Postpone Transfer button, which will end the process and continue the transfer during the next update cycle.
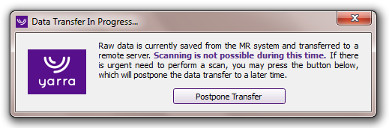
The client first saves all data onto the local hard drive. Afterwards, the data will be copied to the final network location. During the latter, scanning is possible again (a small running indicator will be visible at the right-bottom of the screen). Therefore, the scanner will only be blocked for a short period of time, which makes it possible to run data transfers in-between patient scans.
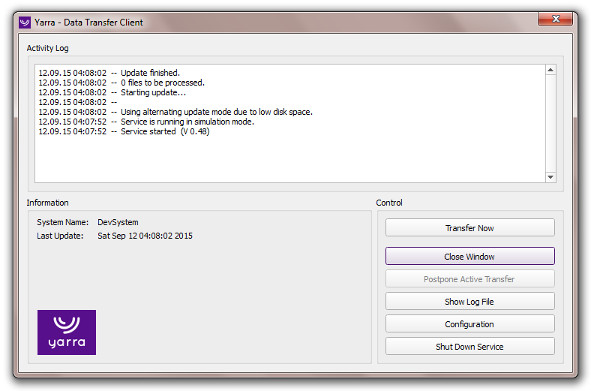
Status Window
The activity of the RDS client can be monitored using the status window, which can be displayed by double-clicking on RDS.exe (or a corresponding shortcut in the Windows Start menu) when the RDS client is running. The status window can also be used for triggering the data transfer manually (by clicking Transfer Now), accessing the configuration window, and terminating the RDS client by clicking Shut Down Service. If this window is closed, either by clicking Close Window or the X on the top-right Window corner, the RDS client will continue to run in the background.
Storage Location
The raw data files will be transferred to the Base Path specified in the configuration dialog and stored using the following folder scheme:
[base path] \ [system name] \ [project name]
Thus, the data from different projects and MR systems are separated into different folders. At this time, the folder structure is fixed and cannot be modified. This may be changed in a forthcoming update.
Log Files
All operations of the software are documented chronologically in a log file. This log file can be found in the subfolder “log” and is called “rds.log”. To facilitate the remote diagnosis of problems with the data transfer, the log file from each system is copied into the system’s subfolder on the network drive after each update procedure. If the log file exceeds a critical size, it will be archived and a clean file will be created.
Creating “Transfer Now” Shortcut
The RDS tool will automatically transfer the raw data when the transfer condition is met (e.g. at a certain time). However, in practice it is sometimes necessary to start the data transfer earlier. For this purpose, it is possible to create a shortcut in the Windows Start menu, which will trigger the data transfer.
Starting with version 0.54, the Yarra RDS client offers a menu that opens by right-clicking on the small Yarra icon in the top-right corner (center-bottom on XA versions). This menu contains an item for triggering the transfer, so that it’s not necessary anymore to create a separate shortcut. See it here.
Create a Windows shortcut linking to the executable RDS.exe, as described in the installation section. Then right-click on the shortcut file, select “Properties”, and change the target to “C:\yarra\RDS.exe –update”. Afterwards, rename the shortcut “Transfer Now” (or something similar) and move it into the Windows Start menu.