Clients - SAC Client
Usage
The SAC client is intended for installation on stand-alone Windows workstations and can be used to submit measurement files for reconstruction that have been previously saved either manually using the Siemens TWIX tool or automatically using the Yarra RDS client.
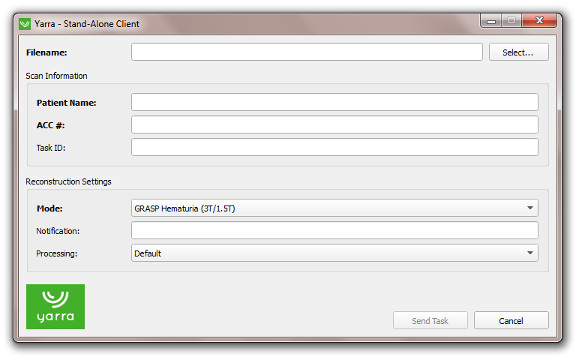
To send a task, click on the “Select…” button and choose the .dat (TWIX) file that you want to reconstruct. The client will show the patient name and pre-select the reconstruction mode according to the protocol tags contained in the protocol name. The reconstruction mode can afterwards be changed using the “Mode:” control. If the reconstruction mode requires an ACC number, the “ACC #:” field will appear in bold letters. If the mode asks for a complementary parameter, an additional user control will appear. The Task ID field will – by default – be set to the selected file name. It can be helpful to change the Task ID to a more meaningful name before submitting the task (this can make it easier to identify the reconstructed images, e.g., if the results are exported to a common network share).
The task priority can be selected using the “Processing:” control. Yarra has 3 processing priorities: Default, Priority, and Night. Normal tasks should be submitted with Default priority. Tasks that are expected to run for long time should be submitted with Night priority. Depending on the server setting, these jobs will be processed only from 11pm – 5am to avoid that the server is blocked during normal working hours. If results are needed urgently, the Priority mode can be selected. Priority tasks will be processed before any other reconstructions. Some reconstruction modes may automatically assign the Night priority. If the results are needed faster, this can be overwritten by selecting Priority.
Enter your email address into the “Notification:” field to receive notifications on completion or failure of the task.
Only institution-internal email addresses should be used for the notifications. As the notifications contain PHI such as the patient name, external email addresses must not be used (and will be blocked).
Configuration
Configuration of the SAC client is possible by clicking on the green Yarra logo with the right mouse button and selecting “Configuration…”. On the first launch of the SAC client, it will automatically show the configuration window.
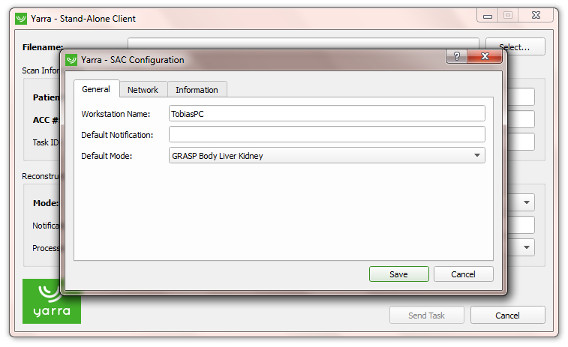
On the General tab: Enter a unique Workstation Name that allows identifying the computer from which the reconstruction task was submitted. This can be helpful if reconstruction problems occur. You can enter an email address into the Default Notification field, which will be used as default setting for the Notification field when the client is started. This avoids having to re-enter the notification address over and over again. It is also possible to select a Default Mode, which will be automatically selected if the protocol name of the loaded .dat file does not contain a valid protocol tag.
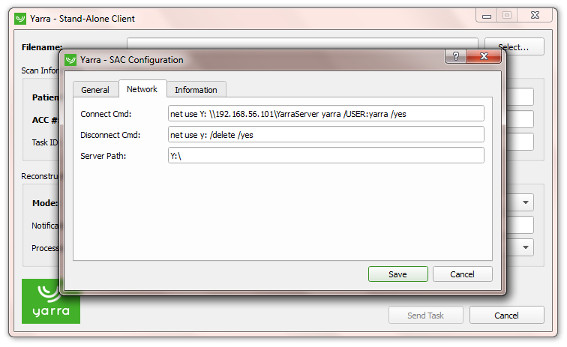
On the Network tab: Enter the Windows shell commands for connecting and disconnecting from the share provided by the Yarra server (if the Yarra server has been configured according to the description on the Server Installation page). Also, enter the path to the drive location where the Yarra server share is mapped when the connect command is executed.
If the Yarra server has been installed according to the steps on the Server Installation page, the following settings should be used:
Server Path: Y:
Connect Cmd: net use Y: \[ip of server]\YarraServer [password of user yarra] /USER:yarra /yes
Disconnect Cmd: net use y: /delete /yes
The settings for the SAC client are stored in the file sac.ini. To simplify the installation within an institution, it is an option to distribute the client with pre-configured sac.ini file.