Addons - Archive Search
Introduction
When collecting raw-data files from a large number of patients (e.g., through Yarra offline reconstructions or using the Yarra RDS client), it can quickly become difficult to find the data file from a certain patient or exam (as needed for performing retrospective studies). This problem is solved by Yarra Archive Search (YAS), which can be used as add-on for a YarraServer installation or completely independently from other Yarra components.
YAS consists of an indexing service, which typically runs every night as cron job on a Linux server, and a web-based front-end, which allows users to search for raw-data files by patient name, scan protocol, exam date etc. and provides the exact file location and additional information about the scan. Although intended for intranet use only, the front-end is password protected to ensure that only authorized staff has access to the scan information.
Installation and Configuration
YAS requires a Linux based server running either Ubuntu 16.04 LTS or 18.04 LTS. It can be installed on a separate server, or in parallel to a YarraServer daemon.
Download the YAS package and unzip it in a folder on the Linux server. This can be a subfolder in the home directory of user “yarraserver” or any other user, e.g. /home/[username]/yas.
Edit the configuration file YAS.ini. It is necessary to define the port number, password for the user interface, and to list all folders that should be scanned for Siemens raw-data files (aka Twix files). By default the configuration file reads:
;### Configuration file for Yarra Archive Search ###

[WebGUI]
;# Defines the port to be used for the web interface. The value needs to be different
;# from the port used for the Yarra WebGUI if running on the same server.
Port=9090

;# Defines the password for accessing the web interface.
Password=SetPasswordHere


[Indexer]
;# Defines for how many days entries remain in the database if they were not seen
;# during the search run (entries are not removed immediately to avoid that the
;# whole database needs to be recreated if a network share was temporarily not
;# available during a search run).
KeepUnseenEntries=14


[Folders]
;# Defines which folders should be searched for raw-data files. Multiple folders
;# can be listed. Format: /path/on/linux/server=yes

;/path/to/rawdata=yes


[FolderAlias]
;# This section allows defining alias names for each search path. This can be useful
;# if the mount point on the server is different from how the location is mapped
;# at the users' workstations. For example, if the raw-data is located at /media/rawdata
;# on the server but end users map this folder under drive V:, it can be helpful to
;# define an alias /media/rawdata=V:. In this way, the file location will be displayed
;# relative to drive V: in the web interface, making it easier for the users to navigate
;# to the location. Entries must be named identical to the full path listed in [Folders].

;/path/to/rawdata=/alias/to/use
Run the indexer once by calling
./YASIndexer
from the YAS installation folder. Depending on the amount of raw-data files, the search procedure might take a few minutes.
Setup the YASIndexer as daily Cron job. It’s recommended to run it during the night when it is unlikely that people will use the frontend. Type in the following command:
crontab -e
and insert the following line:
0 5 * * * cd /home/[username]/yas && /home/[username]/yas/YASIndexer >> /home/[username]/yas/cron.log 2>&1
where [username] denotes the name of the user under whose home folder YAS has been installed (the path might have to be adjusted depending on the actual installation location). This will launch the indexer every night at 5am and write the output into the file cron.log. On the first execution of the crontab command, it may ask you for the preferred editor. Nano should be selected here.
Setup the YASWebGUI as daemon service by editing the file yaswebgui.service (e.g. with “nano yaswebgui.service”) and adjusting the installation location if necessary (in the example shown below, it is assumed that YAS is installed in the home folder of a user, i.e. /home/[username]/yas where [username] needs to be replaced with the username):
[Unit]
Description=YAS WebGUI
Documentation=http://yarraframework.com
After=smbd.service
Requires=smbd.service

[Service]
Type=simple
User=yarraserver
WorkingDirectory=/home/[username]/yas
ExecStart=/home/[username]/yas/YASWebGUI

Restart=on-failure
RestartSec=3

[Install]
WantedBy=multi-user.target
Copy the file yaswebgui.service to the directory /etc/systemd/system (this can only be done using administrator rights). Start and enable the YASWebGUI with the commands:
sudo systemctl enable yaswebgui
sudo systemctl start yaswebgui
Yarra Archive Search should now be ready to use.
Usage
If configured as described above, the YASIndexer will automatically update the database of raw-data files every night. To search for scan, open a web browser and type in the URL http://xxx.xxx.xxx.xxx:[port], where port is the port number defined in the configuration file (e.g. http://192.168.1.101:9090). The port number can be omitted when using port 80, which however requires sudo rights on the server. The search page becomes visible after the password has been entered.
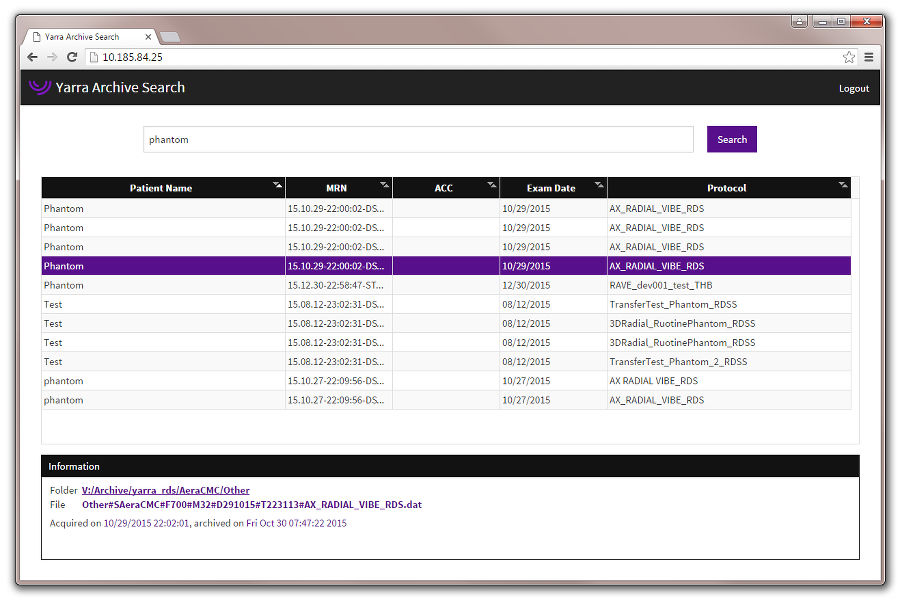
Scans can be searched by patient name, patient ID (MRN, accession number (ACC), protocol name, or exam date. If multiple search entries are entered, scans are displayed that match to both search terms (AND). When clicking on an entry in the result table, details will be displayed in the Information box below the table. If the file comes from a Yarra offline reconstruction task, additional information about the task will shown. The exact file location is shown as a link and can be copied right into the file selection box of the Yarra Stand-Alone Client (SAC), which can be handy for submitting retrospective reconstruction tasks.
To clear and rebuilt the database, call
./YASIndexer –clear
and rerun the YASIndexer afterwards.