Logserver - Configuration
LogServer Configuration
Initial User for Admin Interface
After the installation, there won’t be any users set up in the web interface. Click the “Register” link and provide your email and set a password. LogServer will send an email with a link to verify the email address. It is recommended to only use institutional email addresses. You can skip verifying your own email address by running this command:
sudo su postgres -c "psql -d yarralog -c 'update auth_info set email=unverified_email where id=1;'"
After verifying your email address, you need to activate the account (this is normally done in the web interface by one of the admin accounts, but not possible for the initial user). The initial user can be activated by running the command:
sudo su postgres -c "psql -d yarralog -c 'update auth_info set status=1 where id=1; update \"user\" set role=1 where id=1;'"
YarraLogServer configuration files (and resources) are all stored in
/opt/yarralogserver/
The important config files are YarraLogServer.ini and wthttpd. Depending on your setup, you need to edit one or both of them.
API Key
You need to select an API key to prevent unauthorized clients from sending data to LogServer (although this would be very unlikely, as the LogServer is only reachable within the intranet). The API key needs to be set on all your installations of RDS clients. This is a basic mechanism to only let RDS clients send information to the database. Set the API key in the [Server] section of YarraLogServer.ini.
Ports
By default, LogServer runs on port 4444 and the web-based admin interface LogViewer under 4443. This can be changed in YarraLogServer.ini.
Database Connection
YarraLogServer.ini defines two database connection strings, one for the LogServer and one for the LogViewer. They do not need to be changed, but if you want to host the database on another server, this is the place to tell YarraLogServer about it. Make sure they are both connecting to the same server.
SSL Certificate
By default, the installer creates a self-signed certificate that is valid for localhost and places it in /opt/yarralogserver/cert/. This is sufficient to get the system working, but you may want to generate a new certificate to match an internal domain or use a certificate signed by a real certificate authority (CA). You can set the paths to find your cert and the private key in wthttpd. The server will fail to start unless the private key is owned by user yarra with file permissions 0600.
RDS Configuration
Make sure that you are using the newest version of the Yarra Client package. It is recommended to install and configure RDS on one scanner first and to test that everything is working before installing on additional scanners. The basic installation instructions for RDS can be found here.
If you are using a self-signed certificate for the server, you need to copy the public certificate into the installation folder of the Yarra client, so that the client will trust the server. Place it in the same directory as RDS.exe and rename it to logserver.crt.
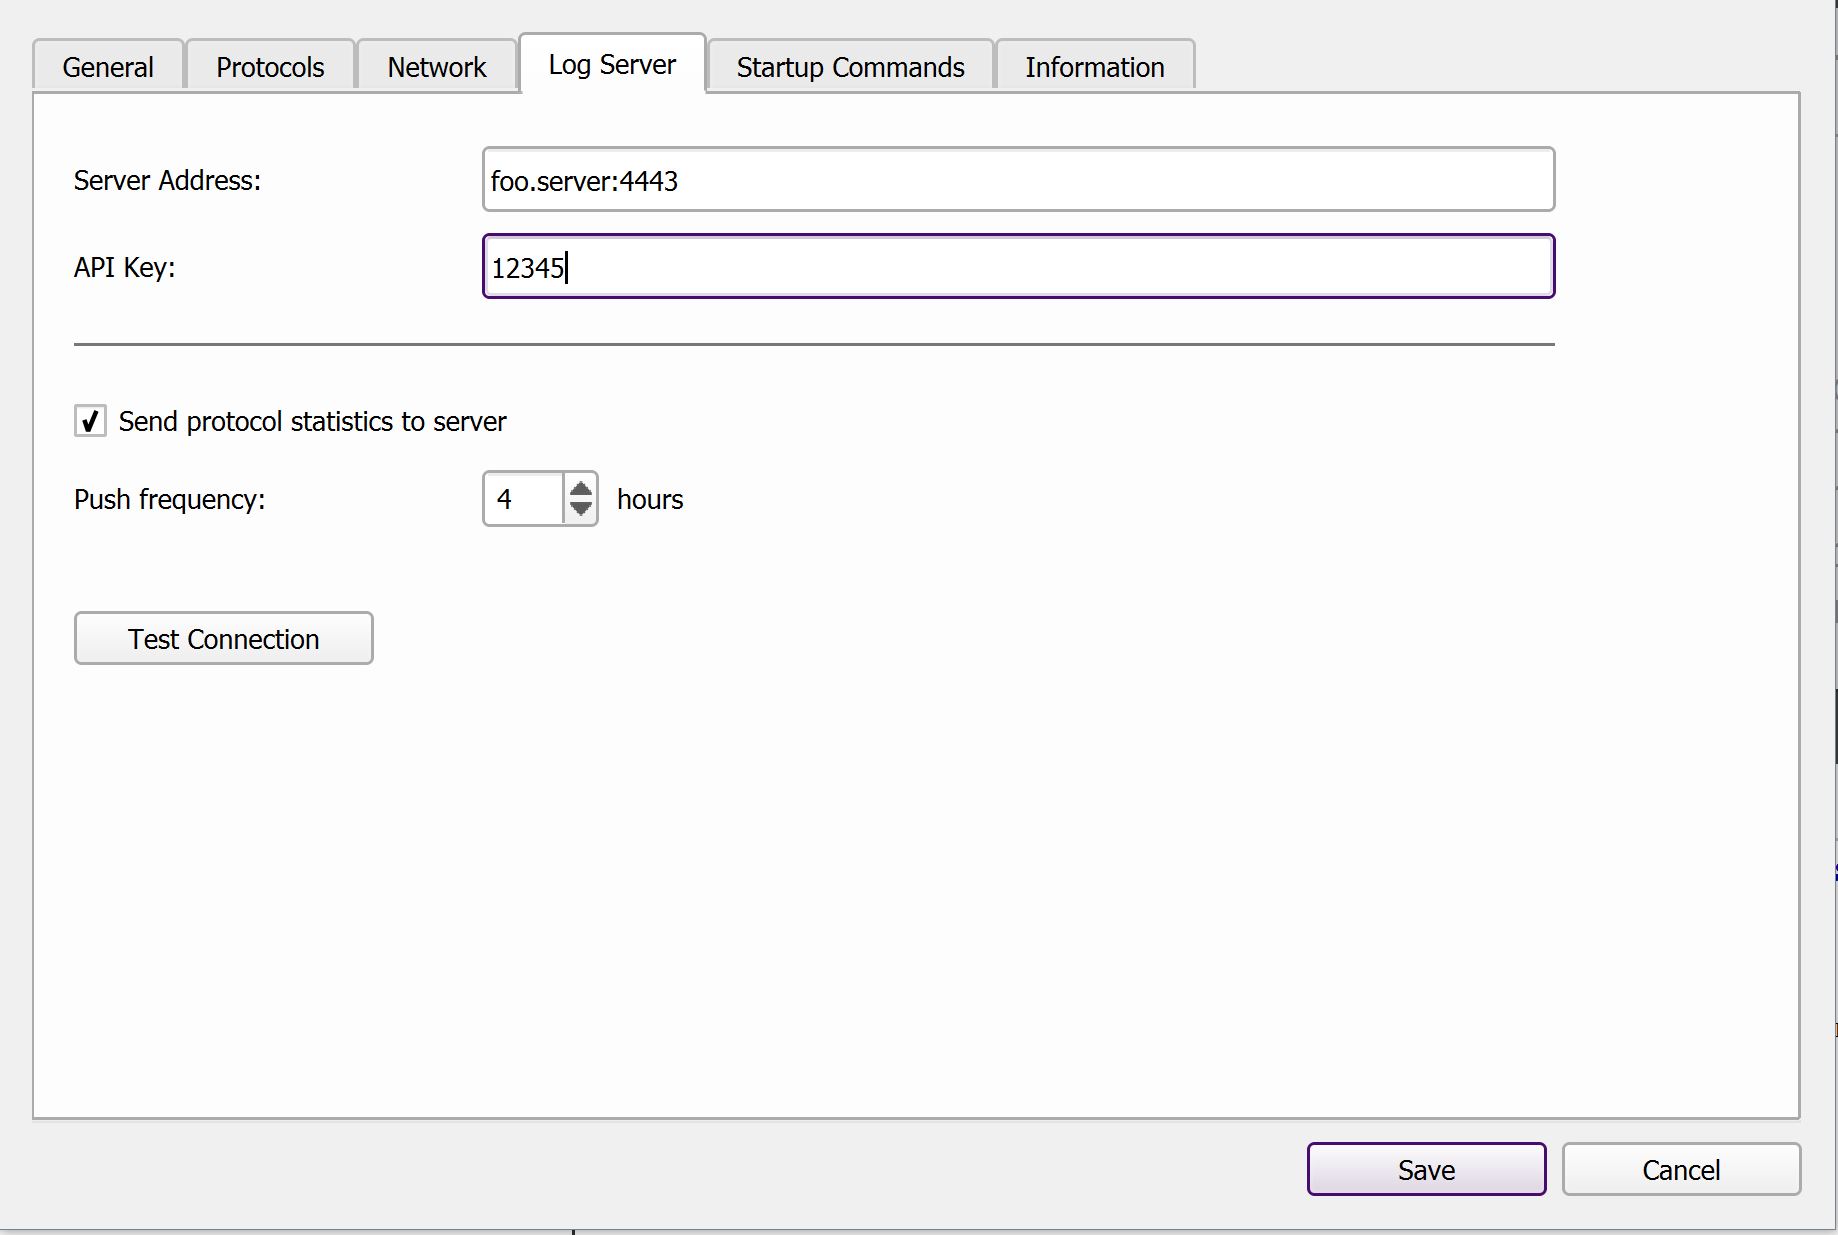
The configuration interface of RDS has a tab called “Log Server” where you can set the address of your LogServer and the API key. The “Push Frequency” specifies how often RDS should push workflow information to the server. Press the “Test Connection” button to validate that the client can talk to the LogServer. It should show “Success” in green color.
Additional Information
DNS Validation
As a safety measure, RDS will only connect to a Yarra LogServer if both the client computer and the server are in the same network domain. This prevents accidental misconfiguration or intentional rerouting of information outside of the hospital network.
To validate that both systems are in the same network, the Yarra client will request the DNS name of both computers from the configured DNS server (via a nslookup call). Only if both computers are known to the DNS server and if their network domains match will the connection be established. This requires that both computers have an entry in the DNS server. Sometimes, this is not the case for MRI scanners by default, that a DNS entry for the scanner needs to be requested from the local IT department.
The DNS validation can be disabled in the source code of the Yarra clients. However, we do not recommend this and do not provide compiled binaries with disabled validation.
Patient Names in Epic Format
Our workflow uses patient names that come out of Epic’s database system. Therefore, Yarra LogServer handles names that appear to be in the following format in a special way:
SURNAME^FORENAME^NAME^^,yyyymmdd
The last digits are the patient’s birthday. They are parsed and stored separately in the database. However, this is not required and LogServer also works if the patient name has a different “non-Epic” format.
Exam Tagging
Because Yarra LogServer only receives the sequence names from the scanners, it doesn’t have information about the specific examination protocol or about the clincial indication of the examination. However, it is often important to be able to differentiate between different exam protocols or to exclude research / phantom scans from analyses.
To enable this, we included a mechanism that utilizes a quick “dummy” sequence at the beginning of each patient exam (usually after the localizer) to obtain additional information on the exam. These “dummy” or “tagging” scans exist entirely to provide procedure information to the LogServer and do not create any images (we are typically using the standard “GRE spectro” sequence with minimal flip angle and shortest possible duration of ~200 ms). The name of the tagging sequences has to follow the naming scheme:
$SECTION_REGION_BODYPART_VARIANT #TAG1 #TAG2
For instance, you might name the tagging sequence of a brain scan for seizures:
$NEURO_HEAD_BRAIN_SEIZURE
In a retrospective analysis, it is then possible to filter on exams indicated for “seizure” or to identify all “neuro” scans. Moreover, it allows excluding research, phantom, or QA scans. The exact values for SECTION, REGION, BODYPART, and VARIANT can be selected freely. Additional “hashtag” values can be appended to the name of the tagging sequence. These hashtags allow giving exams further attributes and can be used to track anything that doesn’t fit into the section/region/bodypart/variant schema (e.g., #sedation for indicating that the exam was performed under sedation).
Long Patient Names
Long patient names combined with long sequence names can cause RDS to be confused in rare cases. It’s important to make sure that for every patient examined, there is at least one sequence run with fewer than 31 characters in its name. Usually this would be an adjustment scan or a scout scan.
ORT Configuration
Yarra LogServer can be used to monitor usage of the ORT client on the MRI scanners and to detect errors. If configured, ORT will transmit diagnostic information to the LogServer whenever tasks are submitted and if problems occur (e.g., if the ORT client cannot connect to a YarraServer or if the scanner’s diskspace is running low).
The activate LogServer support for ORT, open the configuration dialog (as described here) and go to the “Log Server” page. Follow the same configuration steps as described for RDS. It is also necessary to copy the SSL certificate into the installation folder of the client (if not already done for the RDS configuration).
YarraServer Configuration
Starting with the next release of YarraServer, also the server application can transmit diagnostic information to Yarra LogServer. This facilitates managing a large fleet of Yarra servers. The transmission of the diagnostic information needs to be enabled in the configuration file YarraServer.ini. The required settings will be posted on this page soon.
Under Construction
Sorry, this section is still missing. Please check again soon.